Here i will post things im working on or what im watching and trying. You all can post cool things you see in videos as well.
Total Pageviews
Tuesday, December 18, 2012
Clintons workshop
Havent been on for a while so todays lesson is The chew. Anyone watch the show love the Clintons workshop heres some videos :
Watch this super cute -- gonna make some trays and see how they work maybe some balls too. Merry Christmas
Wednesday, August 8, 2012
Stamps
Today since im stamping for a swap in my Scrapbook swap group todays lesson is
Cleaning Your Stamps
Cleaning Your Stamps
|
Picture this . . .You've just contaminated your
yellow stamp pad with blue ink after forgetting to clean off
your stamp. That's one reason why it is a good idea to get
into the habit of cleaning your stamps after each use, especially
when changing colors.
The handiest method for cleaning stamps is with
a bottle of stamp
cleaner with a scrubber or roll-on applicator top. Apply
the cleaner directly to the stamp, and then scrub it off onto
a household sponge. Blot the stamp dry with a paper towel.
Another method of cleaning stamps is to rub
them over the surface of a damp sponge. A cellulose sponge
works best because it does not break down or "lint up" your
stamps. The sponge may be dampened with plain water, or a
drop or two of dish soap can be added. Keep the sponge in
a plastic container with a cover so it's ready at all times.
Occasionally rinse the sponge out in water. This method of
cleaning works well for water-soluble inks.
Alcohol-free baby wipes also work well for cleaning
stamps.
S T A M P I N '
T I P S
|
Tuesday, August 7, 2012
Crop August 24th 2-8 Miamisburg
Take your creativity to a new dimension!
Learn to create adorable lunch box notes for loved ones with Thickers™
from American Crafts™. Plus, enjoy 10% off your entire regular price
purchase, when you take a class at Michaels. You can even enter to win
some Thickers™ of your own! Only 5$ and use our tools is a great girls night and wont disappoint if u love to scrapbook. must register 24 hours in advance
8111 Springboro Pike
MIAMISBURG, OH 45342-3703
(937) 291-3759
MIAMISBURG, OH 45342-3703
(937) 291-3759
Pink Party at work
 |
| A card i created for an open house as a sample |

New Classes starting :
 | ||
| My sample of the two page layout |
Pink Party : Have someone who has endured Cancer and is a survivor. I am now teaching a class that's only 244. All you have to buy is some easy things to make a themed two paged layout , invitation and card. This is perfect and will also complete a banner that says SURVIVOR. If you want to receive emails about my classes email me at jenniferlepard03@yahoo.com. Also if your not in Ohio or near Miamisburg call your Michael 's store and tell them your interested !
1. There are four components to paper craft classes at Michaels - lots to choose from: a. Spotted Canary School
b. Martha Stewart Crafts Studio™ Classes
c. Michaels $5 Crop
d. paper-ED™
2. paper-ED™ is a series of exclusive paper craft classes at Michaels that you can’t find anywhere else.
3. No matter which class they take, students leave with completed projects.
4. Every customer who registers gets a class syllabus with a 10% off ERPP coupon!
5. paper-ED™ class projects include page layouts, cards, paper parties and home décor items.
6. It’s easy to sign up for a class! Registration forms and syllabus are located in the class binder with Wilton registrations. Skus are located on each registration form.
7. Students are not required to purchase the exact papers or embellishments featured in the syllabus - we want them to express their style.
8. Our instructors are all Certified Scrapbook Instructors (CSIs).
9. Associates can take classes for free as long as someone signs up! Just bring or buy your own supplies, invite and tell people about the classes.
10. It’s FUN!
Classes we offer: · Altered Canvas · Card Tricks · Card Tricks in a Flash · Card Tricks Punched · Countdown to the Holidays · Paper Bag Mini Album · Paper Crafted Gift Frame · Pink Party · Sketched Out · Texture WOW · Cricut Workshop: Winter Frolic · Cricut Card Tricks: Winter Frolic · Paper Party – use Happy Birthday America Leader Guide, update for season · Flower WOW!n · Paper Crowns · Sketched Out 2 · cricut® card tricks: sophisticated · cricut E2 test drive · cricut expression™ test drive · tINKer time: Distress and Shimmer · cricut expression™ Test Drive Handout · Smashed - A Class for SMASH
Sunday, May 27, 2012
My job at Michaels
8111 Springboro Pike
Miamisburg, OH 45342
Tel: (937) 291-3759
Hours: Mon-Sat: 9:00am - 9:00pm Sun: 10:00am - 7:00pm
This is my store and this is the classes i teach.


Miamisburg, OH 45342
Tel: (937) 291-3759
Hours: Mon-Sat: 9:00am - 9:00pm Sun: 10:00am - 7:00pm
This is my store and this is the classes i teach.


Monday, April 30, 2012
Last day 30th of March design 24
Last post for the design team. I guess i didn't sign up for the design team for March but it was fun and i met some wonderful ladies . And always a fan of Daisy Collins work. Hope everyone has enjoyed my cards. AS usual check out the other talented ladies:
April Design Team
April Design Team
- Daisy Collins- www.tsunamirosedesigns.blogspot.com
- Kimberly Pate ~ http://scrappingrookie.blogspot.com
- Veronica Meras-http://createdbymeras.blogspot.com/
- Maryann Cruz - http://www.sprinkledpinkcupcake.blogspot.com
- SuzeJo Murphy - http://CrimsonMoonCrafts.blogspot.com/
- Jennifer Lepard http://jenlovestoscrap.blogspot.com/
- Abbie Kay - http://powered-by-fairydust.blogspot.com
- Jane Stillman - http://janesplaice.blogspot.com
- Rachel Bogner - http://rcbogner.blogspot.com
- Tricia Colon http://mycrazybubble.blogspot.com/
Sunday, April 29, 2012
Card 18 day 29
 |
| u cant tell from the picture but there is scallops and bling bling adores the sides. This card was fun to create and has handmade scallops. |
- Daisy Collins- www.tsunamirosedesigns.blogspot.com
- Kimberly Pate ~ http://scrappingrookie.blogspot.com
- Veronica Meras-http://createdbymeras.blogspot.com/
- Maryann Cruz - http://www.sprinkledpinkcupcake.blogspot.com
- SuzeJo Murphy - http://CrimsonMoonCrafts.blogspot.com/
- Jennifer Lepard http://jenlovestoscrap.blogspot.com/
- Abbie Kay - http://powered-by-fairydust.blogspot.com
- Jane Stillman - http://janesplaice.blogspot.com
- Rachel Bogner - http://rcbogner.blogspot.com
- Tricia Colon http://mycrazybubble.blogspot.com/
Saturday, April 28, 2012
seen this from Joys life page and decided to share
Cricut Blade Settings
Posted by superjoy on December 9, 2009

The
Regular Blade Housing that comes with the Cricut is Green, unless you
have a colored Cricut then it is most likely the color of your machine.
(following info is from Cricut)
The Cricut is really just a paper/cardstock cutter. A range of vellum to Bazzill is very safe. Other products may be tried, both of the thinner or thicker variety, but results are not guaranteed. In fact, using something extreme will most likely void the warranty. We don’t say that to scare you away from experimenting, but there are just too many materials out there to know what the results would be.

That said, the basic guidelines are that the material (paper or otherwise) needs to be stiff and firm enough for the blade to drag through it. So a more stretchy fabric would probably not work, unless it had Wonder-Under or something to keep it in place. Pages 14 and 15 in your Cricut user manual address the various recommended settings for blade length, speed, and pressure settings to use while cutting various types of paper.

Here are some Cricut recommended paper settings to try:
The Cricut is really just a paper/cardstock cutter. A range of vellum to Bazzill is very safe. Other products may be tried, both of the thinner or thicker variety, but results are not guaranteed. In fact, using something extreme will most likely void the warranty. We don’t say that to scare you away from experimenting, but there are just too many materials out there to know what the results would be.
That said, the basic guidelines are that the material (paper or otherwise) needs to be stiff and firm enough for the blade to drag through it. So a more stretchy fabric would probably not work, unless it had Wonder-Under or something to keep it in place. Pages 14 and 15 in your Cricut user manual address the various recommended settings for blade length, speed, and pressure settings to use while cutting various types of paper.
Here are some Cricut recommended paper settings to try:
| Cricut™ Paper Settings | ||
| 65# | 80# | Bazzill |
| Speed = Max | Speed = High | Speed = Low |
| Pressure = High | Pressure = Max | Pressure = Max |
| Blade Depth = 4 | Blade Depth = 5 | Blade Depth = 6 |
Deep Cut Blade Settings:
The deep cut blade is recommended for:
Magnet (0.035″/0.80mm thick) with the recommended settings of
Speed 3 (medium)
Pressure 5 (max)
Depth 6
Multi Cut 4
Speed 3 (medium)
Pressure 5 (max)
Depth 6
Multi Cut 4
Chipboard (0.059″/1.50mm thick) with the recommended settings of
Speed 3 (medium)
Pressure 4 (high)
Depth 6
Multi Cut 5
Speed 3 (medium)
Pressure 4 (high)
Depth 6
Multi Cut 5
Stamp (0.0415″/1.05mm thick) with the recommended settings of
Speed 3 (medium)
Pressure 4(high)
Depth 4.6
Multi Cut 1
Speed 3 (medium)
Pressure 4(high)
Depth 4.6
Multi Cut 1
Remember
to REMOVE THE RUBBER ENDED TIP before using your new blade!!! That tip
is covering the blade. The rounded end goes up into the housing. When
you push down that little plunger at the top, the magnet inside will
pull the rounded end securely into the housing.
Friday, April 27, 2012
Little behind in my cards so posting a few had them done just didnt blog
 |
| Day 24 Sketch 11 |
 |
| Day 25- sketch 19 |
 |
| Day26 - sketch 14 |
 | ||||||||
| day 27 sketch 23 todays | Check out others here: |
- Daisy Collins- 1.www.tsunamirosedesigns.blogspo
t.com - Kimberly Pate ~ http://
scrappingrookie.blogspot.com - Veronica Meras-http://
createdbymeras.blogspot.com/ - Maryann Cruz - http://
www.sprinkledpinkcupcake.blogsp ot.com - SuzeJo Murphy - http://
CrimsonMoonCrafts.blogspot.com/ - Jennifer Lepard http://
jenlovestoscrap.blogspot.com/ - Abbie Kay - http://
powered-by-fairydust.blogspot.c om - Jane Stillman - http://
janesplaice.blogspot.com - Rachel Bogner - http://rcbogner.blogspot.com
- Tricia Colon http://
mycrazybubble.blogspot.com/
Monday, April 23, 2012
Day 23 Sketch sketch 3
Im a little behind today but heres my sketch for today a simple anniversary card this is the one i choose to give to my husband yesterday for our anniversary. I started my new selling site--http://www.facebook.com/profile.php?id=100003760631883. I will sell cards photo albums and cricut cuts as well as other scrapbooking supplies i may not need etc.
Sunday, April 22, 2012
April DT Blog Hop Day 2 Intro
Thank you guys for joining the I Love Sketches by Tsunami Rose Design team BLOG HOP!
If you didn't know, Daisy Collins is the designer of these sketches. We have joined her in her daily card challenge and make and post 1 card each day using her sketches! No matter what level of craftiness you have achieved, you will make a fabulous card like what we make every day!
Please hop all of our blogs and leave comments! We will pick 1 grand winner to win a goodie bag of awesomeness from Daisy Collins herself!
Please make sure to "Like" our FB page and join our friendly FB group where you can be inspired by the works of many other talented people who also found how easy it is to create when you LOVE SKETCHES BY TSUNAMI ROSE!
Today's daily challenge is # 30
{ I LIKED THIS SKETCH BECAUSE. . . . . .it was easy and i love the simpleness of it. I used an embossed Sticker and cut a few papers by folding a paper in fourths. I did this one because i was in anniversary mood it says You and me forever. This seems to me it could be for a man or a woman do you agree?
Thanks for joining us for our blog hop! And don't forget to visit the I Love Sketches by Tsunami Rose Blog to see her daily sketch challenge!
If you didn't know, Daisy Collins is the designer of these sketches. We have joined her in her daily card challenge and make and post 1 card each day using her sketches! No matter what level of craftiness you have achieved, you will make a fabulous card like what we make every day!
Please hop all of our blogs and leave comments! We will pick 1 grand winner to win a goodie bag of awesomeness from Daisy Collins herself!
Please make sure to "Like" our FB page and join our friendly FB group where you can be inspired by the works of many other talented people who also found how easy it is to create when you LOVE SKETCHES BY TSUNAMI ROSE!
Today's daily challenge is # 30
{ I LIKED THIS SKETCH BECAUSE. . . . . .it was easy and i love the simpleness of it. I used an embossed Sticker and cut a few papers by folding a paper in fourths. I did this one because i was in anniversary mood it says You and me forever. This seems to me it could be for a man or a woman do you agree?
Please leave a comment for the rest of the I LOVE SKETCHES BY TSUNAMI ROSE DESIGN TEAM and enter to win a chance to win a fabulous package!
- Daisy Collins- http://tsunamirosedesigns.blogspot.com
- Kimberly Pate ~ http://scrappingrookie.blogspot.com
- Veronica Meras-http://createdbymeras.blogspot.com/
- Maryann Cruz - http://www.sprinkledpinkcupcake.blogspot.com
- SuzeJo Murphy - http://CrimsonMoonCrafts.blogspot.com/
- Jennifer Lepard http://jenlovestoscrap.blogspot.com/ You are here <------
- Rachel Bogner - http://rcbogner.blogspot.com
- Tricia Colon http://mycrazybubble.blogspot.com/
Thanks for joining us for our blog hop! And don't forget to visit the I Love Sketches by Tsunami Rose Blog to see her daily sketch challenge!
Saturday, April 21, 2012
Color wheel gotta teach a class on this so thought id share
How do you choose the colors in your scrapbook papers?
Introduction to the Color Wheel
Have you ever noticed the tremendous impact that color itself can have on your scrapbook pages? Color can make a page have a "mood." A brightly colored page may look happy. A page done in pastel colors could remind you of a baby. Or, putting dark colors on a page could make it look too dreary for the pictures.
Colors have their own personalities and strengths. In consideration of these personalities and strengths, colors of paper and embellishments used on your scrapbook pages can either complement or compete with those photos of your precious memories. Colors can also complement or compete with the other colors on the page!
Knowing how to choose and use color on your scrapbook pages just might be the most fundamental resource to successful scrapbooking. Fortunately, once you know the "rules" of color, it isn’t very hard.
In this article, we will discuss the basics of color, the color wheel, and terminology of color. These are important to understand because your scrapbook pages are made using dyes and pigment colors, and colors give consistent results when mixed. These consistent results will also be applicable to layers of vellum, if of appropriate thickness; as well as paints, chalks, and other coloring media that can be mixed. The basics of how colors work will give you a solid foundation of familiarity for learning the "rules" of color. The color wheel helps us understand how all the pieces fit together, and the terminology gives us even more competency in the variations of colors.
1. The Color Wheel
The color wheel is like a rainbow that has been made into a circle to show how all the colors work together and are made from each other. Small color wheels are quite inexpensive, so if you don’t have one, I highly recommend getting one! This is a valuable asset to learning and understanding the nuances of color. My favorite is the Pocket Color Wheel, available online and at craft store.

2. The Colors
With pigments and paints, there are six "basic" colors. The first three are the Primary Colors. You may like to think of these as the "original colors." The Primaries are Red, Yellow, and Blue. They are the original Primary Colors because you cannot mix other colors to get the Primaries. You musthave Red paint to get Red. You cannot make Red from any of the other colors. The same goes for Yellow and Blue. Additionally, Red, Yellow and Blue are the foundational colors from which all other colors are mixed.

The color wheel shows how all the other colors are made from the Primary colors. When you combine the Primary Colors of Red, Yellow and Blue, you can make new colors called the Secondary Colors. These are completely new colors, so they have totally new names. The Secondary Colors are Orange, Green, and Violet. If you take a Secondary color and mix it with a Primary, you get a Tertiary Color. The names of these colors are: Red-Violet, Red-Orange, Yellow-Orange, Yellow-Green, Blue-Green,and Blue-Violet.
.

You will notice that the names of the Tertiary colors are the names of the Primary and Secondary colors that were mixed to make them, always beginning with the name of the Primary Color and ending with the name of the

Secondary Color. These are all the basic colors. You can make variations of these colors, but from here there are no new colors on the color wheel. 3. Neutral Colors and Color Variation Terminology The Neutral Colors are Black, White and Gray. They are not on the color wheel because they are neutral and independent from the Primary Colors. Neutral Colors coordinate with all colors. Neutral Colors do not "clash" with any colors. Neutral Colors also do not "make" any "new" colors by mixing them together. Neutral Colors do produce variations of existing colors.
LINKS TO COLOR WHEEL
http://en.wikipedia.org/wiki/List_of_colors
http://kuler.adobe.com/?sdid=MNJS##
http://www.color-wheel-pro.com/color-schemes.html
Contributor Heather Gibbs, Heather's Scrapbook's
ILS by Tsunami Rose DESIGN TEAM BLOG HOP! {Day 1}
Thank you guys for joining the I Love Sketches by Tsunami Rose Design team BLOG HOP!
If you didn't know, Daisy Collins is the designer of these sketches. We have joined her in her daily card challenge and make and post 1 card each day using her sketches! No matter what level of craftiness you have achieved, you will make a fabulous card like what we make every day!
Please hop all of our blogs and leave comments! We will pick 1 grand winner to win a goodie bag of awesomeness from Daisy Collins herself!
Please make sure to "Like" our FB page and join our friendly FB group where you can be inspired by the works of many other talented people who also found how easy it is to create when you LOVE SKETCHES BY TSUNAMI ROSE!
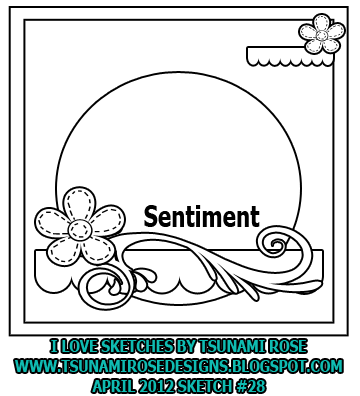
Today's daily challenge is # 28
My rendition:
This is an best friend card . I used an embossed best friend card and since i didn't have squiggles i made my own and i hate them but added cardboard stickers to it to give it more flair also added the words FUN cause that's what u do with an best friend.
This is an best friend card . I used an embossed best friend card and since i didn't have squiggles i made my own and i hate them but added cardboard stickers to it to give it more flair also added the words FUN cause that's what u do with an best friend.
I Like this sketch because. . . . .Its simple yet you could do anything with it
Please leave a comment for the rest of the I LOVE SKETCHES BY TSUNAMI ROSE DESIGN TEAM and enter to win a chance to win a fabulous package!
- Daisy Collins- http://tsunamirosedesigns.blogspot.com
- Kimberly Pate ~ http://scrappingrookie.blogspot.com
- Veronica Meras-http://createdbymeras.blogspot.com/
- Maryann Cruz - http://www.sprinkledpinkcupcake.blogspot.com
- SuzeJo Murphy - http://CrimsonMoonCrafts.blogspot.com/
- Jennifer Lepard http://jenlovestoscrap.blogspot.com/
- Abbie Kay http://poweredbyfairydust7.blogspot.com
- Jane Stillman - http://janesplaice.blogspot.com
- Rachel Bogner - http://rcbogner.blogspot.com
- Tricia Colon http://mycrazybubble.blogspot.com/
And Please remember to come back tomorrow for day 2 of our DT BLOG HOP!
Friday, April 20, 2012
Wednesday, April 18, 2012
day 19 sketch 30
I inked this with some pearlized stamp pad . Cut the words from an ribbon i got thought it would be cute sentiments for cards . Then i got some little birthdays stamps and played with them for borders and such.
April Design Team
- Daisy Collins- www.tsunamirosedesigns.blogspo
t.com - Kimberly Pate ~ http://
scrappingrookie.blogspot.com - Veronica Meras-http://
createdbymeras.blogspot.com/ - Maryann Cruz - http://
www.sprinkledpinkcupcake.blogsp ot.com - SuzeJo Murphy - http://
CrimsonMoonCrafts.blogspot.com/ - Jennifer Lepard http://
jenlovestoscrap.blogspot.com/ - Abbie Kay http://
poweredbyfairydust7.blogspot.co m - Jane Stillman - http://
janesplaice.blogspot.com - Rachel Bogner - http://rcbogner.blogspot.com
- Tricia Colon http://
mycrazybubble.blogspot.com/
Subscribe to:
Comments (Atom)


